How to Photograph the Orion Nebula Without Equipment
The Orion Nebula — Messier 42 — is the most photographed deep-sky object in history. At 1,344 light-years from Earth, it's the nearest star-forming region in our galaxy, bright enough to see with the naked eye, and capable of producing images that stop people mid-scroll. And you don't need to own any astronomical equipment to photograph it.
Why the Orion Nebula?
M42 checks every box for a first astrophotography target:
- Brightness: Magnitude 4.0 — visible to the naked eye from any reasonably dark location
- Size: About 1° across (twice the diameter of the full Moon) — large enough for almost any imaging system
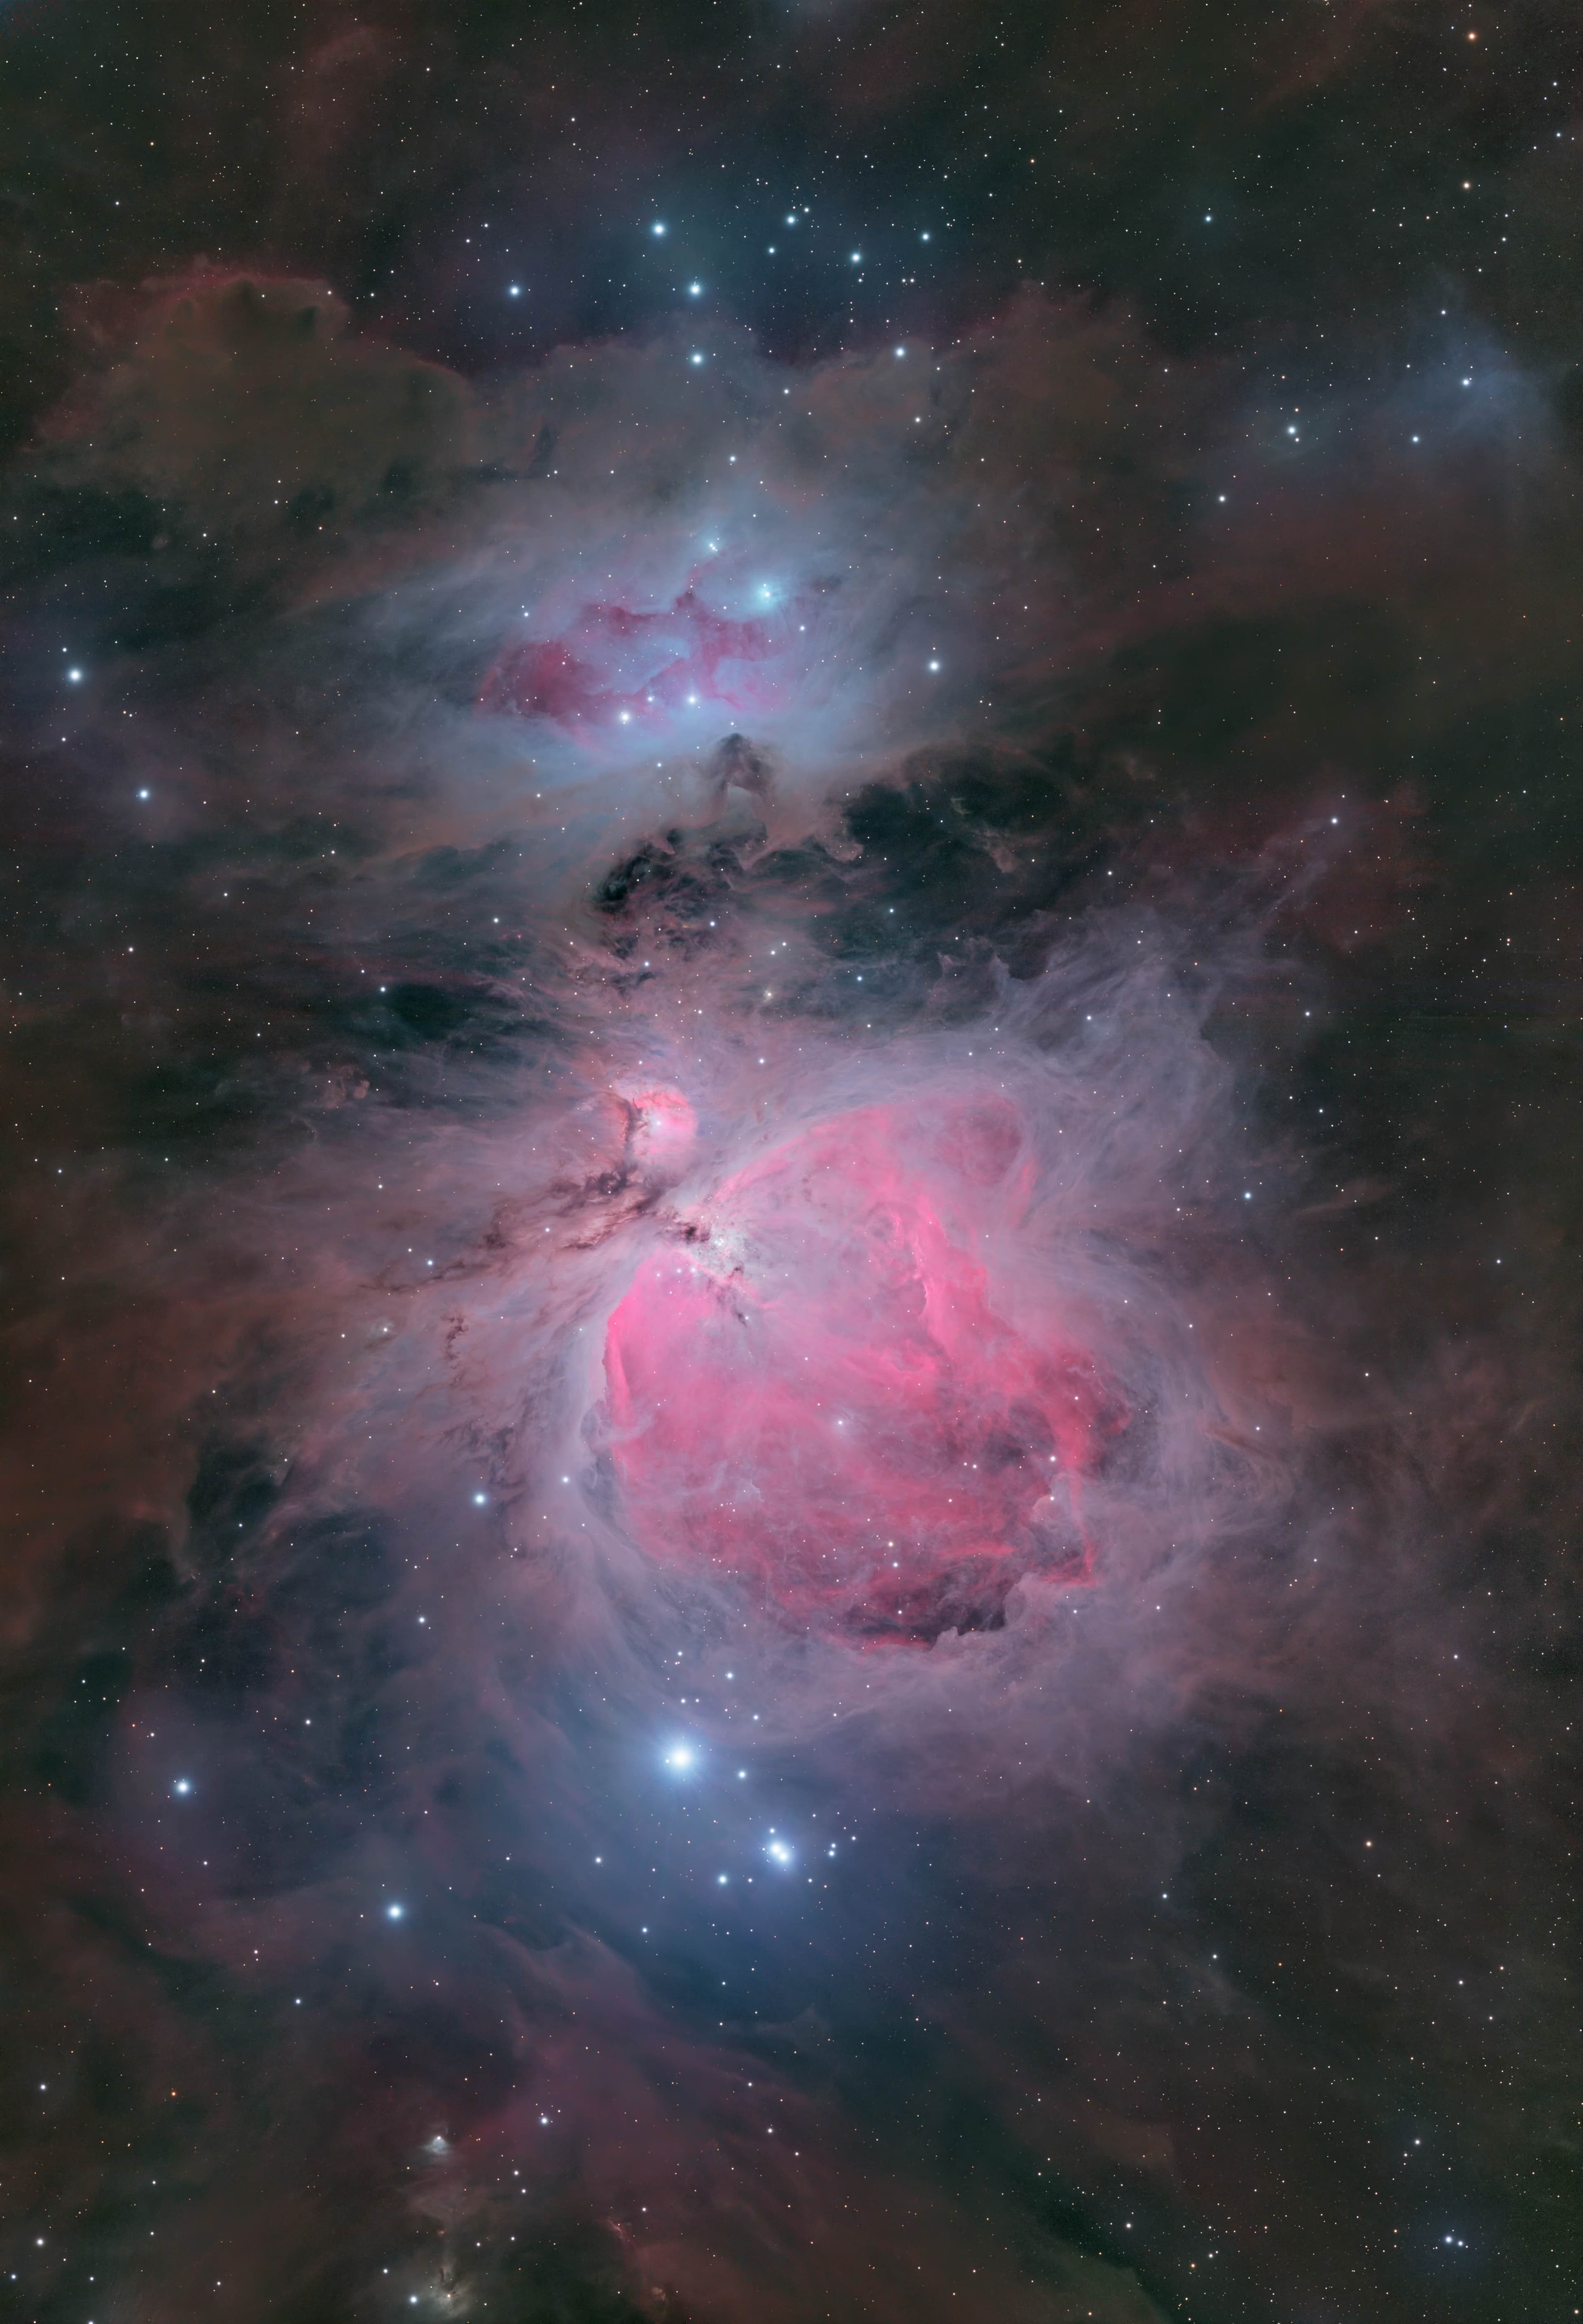
- Structure: Multiple layers — the bright Trapezium core, surrounding ionized gas, the Running Man Nebula (NGC 1977), and faint outer shock fronts
- Accessibility: Visible from both hemispheres, best positioned October through March
- Processing challenge: Extreme dynamic range makes it a genuine technical test — mastering M42 teaches you skills that apply to every other target
The Challenge: Extreme Dynamic Range
M42's greatest asset is also its main processing challenge. The Trapezium core (the cluster of hot young stars at the center) is intensely bright — easy to overexpose in just a few seconds. Meanwhile, the outer nebular wings and the faint Running Man require minutes of exposure to appear.
A complete M42 image requires capturing both extremes and combining them. This means:
- Short exposures (1–10 seconds) to capture the bright core without clipping
- Long exposures (60–300 seconds) to reveal the faint outer regions
- HDR combination in processing to blend both into a single coherent image
Option 1: DSLR on a Tracking Mount
If you own a DSLR or mirrorless camera and can access a tracking mount (even a basic star tracker like the Sky-Watcher Star Adventurer, ~$250), you can capture excellent M42 data:
- Lens: 200–500mm telephoto (or a small refractor telescope)
- Short exposures: ISO 400–800, 2–10 seconds, 20–30 frames for the core
- Long exposures: ISO 1600–3200, 60–180 seconds, 30–50 frames for the outer nebula
- Stacking: Use free software like Siril or DeepSkyStacker
- Location: Bortle 4 or darker gives dramatically better outer nebulosity
Expect usable images within a single clear night. The Orion Nebula is forgiving enough that even imperfect data produces rewarding results.
Option 2: Remote Telescope — Professional Results, No Equipment
The most accessible path to a professional M42 image requires nothing on your end — no telescope, no tracking mount, no travel to a dark sky site.
Remote telescope rental gives you access to a professional observatory located at a Bortle 1 dark sky site. At SkyShare Astro, our Askar FRA400 paired with a QHY600M 61-megapixel monochrome camera captures M42 at a level that rivals images published in astronomy magazines.
Ready to capture the universe?
Professional telescope access from $79/night. Our team handles everything — you process the data.
Book Your Night — From $79Want to rent a telescope online · Read our remote telescope rental guide · Browse astrophotography datasets
A 2-hour session produces:
- Full core-to-outer-nebula coverage including the Running Man
- 16-bit FITS sub-frames ready for calibration and stacking
- Pre-made calibration masters (darks, flats, bias)
- Optional JPEG preview for immediate sharing
Sessions start at $50. The data arrives in your dashboard and you process it yourself — or download a pre-processed dataset from our gallery if you prefer to skip the technical pipeline entirely.
Processing M42: Key Techniques
- Calibrate separately: Apply dark, flat, and bias masters to both your short and long exposure sets independently
- Stack separately: Create a short-exposure master (core) and long-exposure master (outer nebula)
- Stretch carefully: Use a masked stretch or generalized hyperbolic stretch — protect the core from blowing out while pulling up faint outer signal
- HDR combine: Blend the two stacks using HDR combination (available in Siril, PixInsight, or via Photoshop luminosity masks)
- Star reduction: Slightly reduce star sizes to emphasize nebulosity using StarNet2 or PixInsight's StarXTerminator
- Color calibration: Apply photometric color calibration for accurate star and nebula colors
- Local enhancement: Gentle sharpening on the Trapezium core, noise reduction on the outer regions
When to Image the Orion Nebula
- Best months (northern hemisphere): November through February — M42 is high in the sky after sunset and well-positioned for long imaging sessions
- Peak positioning: Around January 1st, M42 transits (reaches its highest point) near midnight
- Southern hemisphere: M42 is circumpolar from latitudes below 30°S — the Atacama in Chile has excellent, high-elevation access year-round, which is why our observatory captures exceptional M42 data
What to Realistically Expect
- DSLR, fixed tripod, 30 minutes, suburban: Colored blob, basic structure visible, stars trailed at longer exposures
- DSLR, tracker, 2 hours, Bortle 4: Core detail, dust lanes, some outer nebulosity
- Remote telescope, Bortle 1, 2 hours, broadband: Sharp stars, full Trapezium detail, complete outer nebula, faint Running Man visible
- Remote telescope, Bortle 1, 6+ hours, Ha + OIII narrowband: Fine shock front structure, gas dynamics visible, image publishable quality
M42 has inspired astronomers for four centuries. In 2026, capturing it in professional detail has never been more accessible — regardless of what equipment you own. Book a session and see what the Orion Nebula actually looks like.
Ready to capture the universe?
Professional telescope access from $79/night. Our team handles everything — you process the data.
Book Your Night — From $79Want to rent a telescope online · Read our remote telescope rental guide · Browse astrophotography datasets